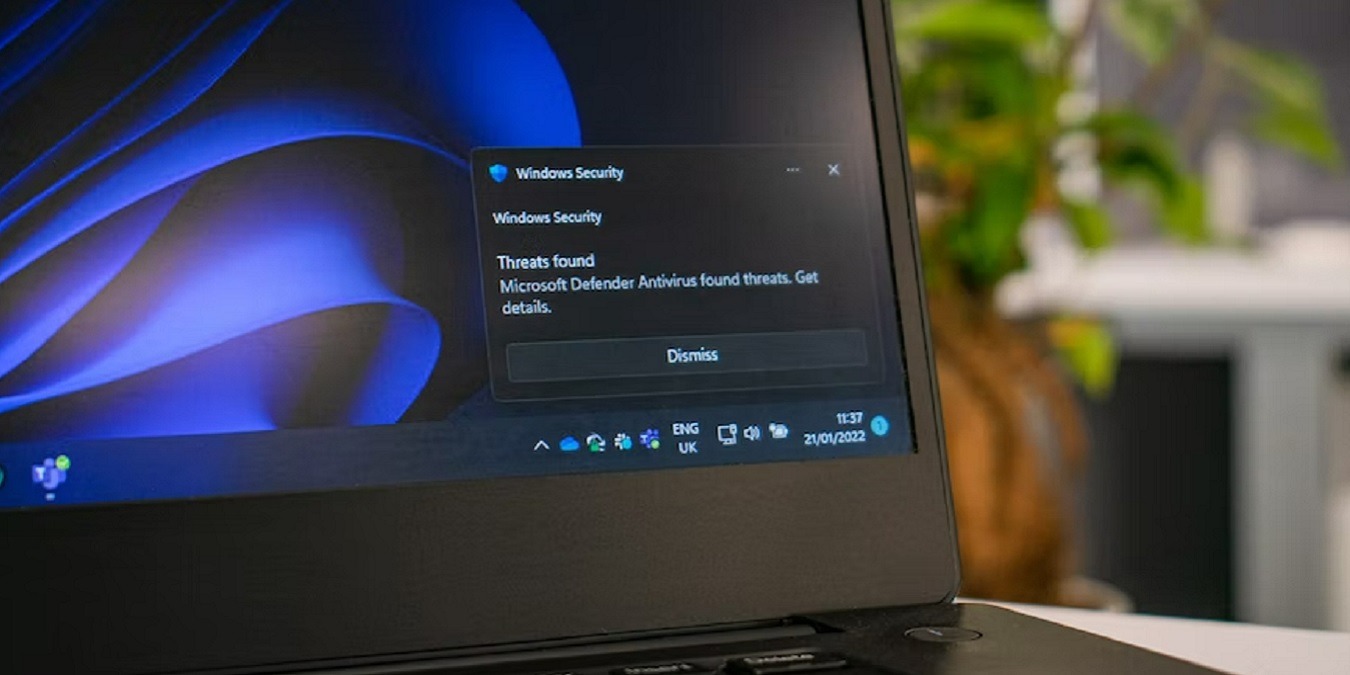
Windows comes complete with Windows Security, which includes Microsoft Defender, formerly Windows Defender. If you don’t find it useful or want to use something else, it’s possible to permanently disable Microsoft Defender. Even better, there are multiple ways to do it. And yes, these methods work to disable Windows Defender, too, on older Windows 10 machines.
Turn Off Microsoft Defender Temporarily
Windows gives you an option to turn Microsoft Defender off. But, it’s only temporary. Once it’s been off for a while, or you restart your PC, it’ll come back on. If you just need a temporary solution, this is it.
Access it by going to Start -> Settings -> Privacy & security.
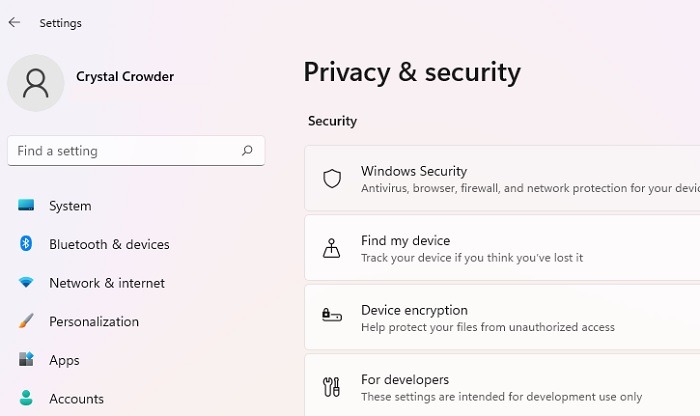
Select Windows Security, Microsoft Defender, or Windows Defender, depending on your version of Windows. If Windows Security doesn’t open, try these fixes.
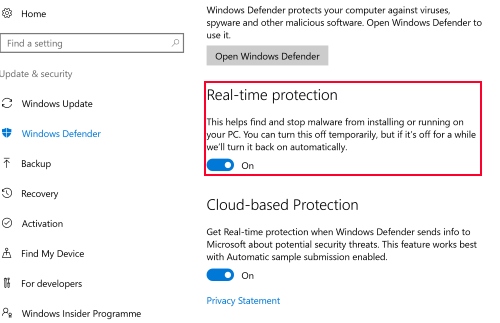
In Windows 10, you’ll see an option to turn Defender off under Real-time protection. However, if you read the description of the setting, you’ll spot the problem. Windows Defender will only stay inactive for a short period of time.
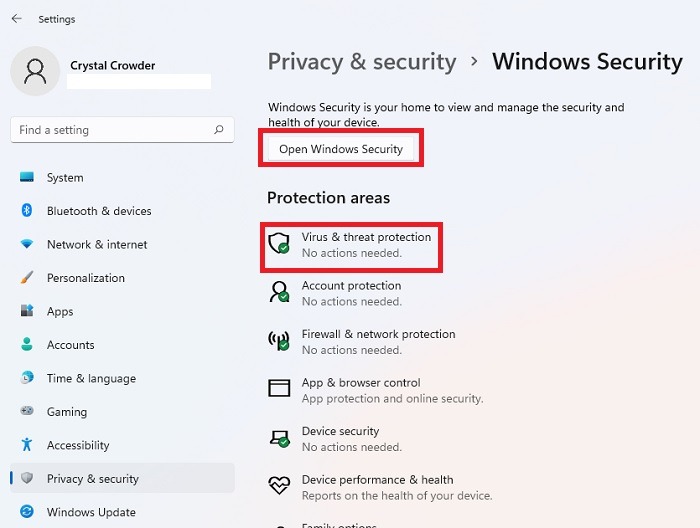
If you’re using Windows 11, the same settings exist, but you have to go through a few extra screens. Click on Open Windows Security, and select Virus and threat protection.
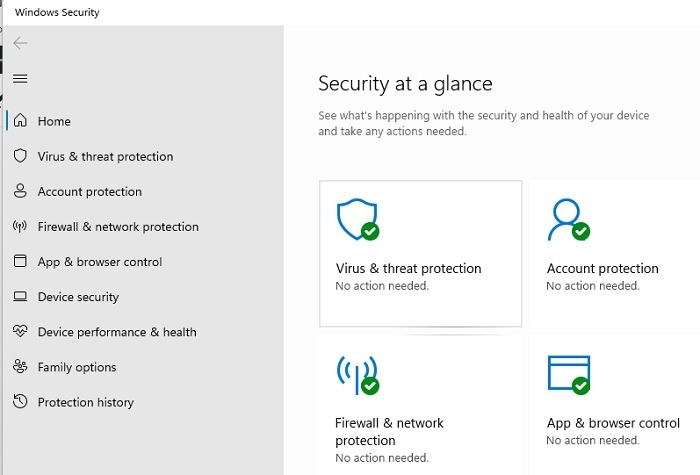
Scroll until you see Virus & threat protection settings. Click the Manage Settings link.
Toggle the various options to Off, just as you would in Windows 10. It’s a pain trying to get to the settings, but once you do, they’ll look similar to Windows 10.
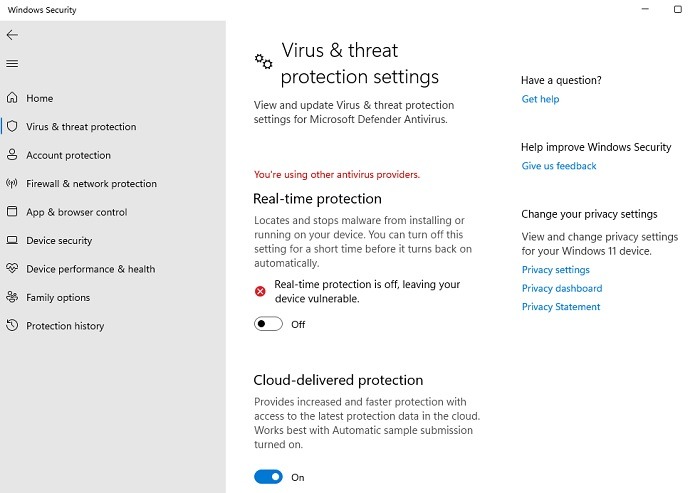
Also, just as in Windows 10, turning everything off is just temporary. This is great if you just need to disable Microsoft Defender for a short while, but doesn’t solve the ultimate goal of turning off Windows Defender permanently.
Note: if you’re already using another antivirus instead of Microsoft Defender, you may not see these settings at all – which is a fix in itself and will be detailed below.
Disable Microsoft Defender Permanently
Fortunately, there are ways to make it so that Microsoft Defender doesn’t reenable itself. Keep in mind that you’ll have to make sure you do not browse the Web without a functioning antivirus active! You need to have something installed beforehand to make up for Microsoft Defender being turned off.
You have a few options when it comes to disabling Microsoft Defender:
- The first is the simplest: install a third-party virus program on your PC to disable the Defender in part.
- For a more permanent solution, go through the registry or Local Group Policy window. Typically, the Local Group Policy solution is a little easier to perform, but it’s not available by default in Windows Home editions. Learn how to enable the Group Policy Editor before proceeding.
Please note that some options do require administrator level access to use. If you are an admin and still get an administrator error, use these tips to fix it.
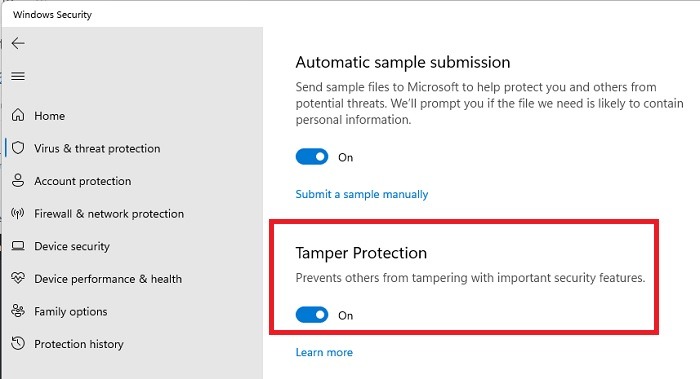
Before you proceed with registry options, you have to disable Microsoft Defender Tamper Protection. This is a great feature that helps prevent another user – or even a virus – from disabling your built-in antivirus. Otherwise, any changes you make in the following sections will go away once you restart.
Go to Start -> Settings -> Privacy & security -> Windows Security.
Select Virus & threat protection. If you don’t see this option, select Open Windows Security, then select Virus & threat protection.
Select Manage Settings near the bottom of the window. Toggle off Tamper Protection.
Using the Registry
Open the Run command by pressing Win + R. Type regedit, and click OK.
Note: Make a backup of your registry before you make any changes. You can do this by opening the Registry Editor, then File -> Export. Place the copy in a safe place. If you want to clean up your registry from time to time, learn how to defragment it.
On the left pane of the Registry Editor, navigate to the following folder:
HKEY_LOCAL_MACHINE\SOFTWARE\Policies\Microsoft\Windows DefenderEven on the most current Windows 11 devices, this folder is usually called Windows Defender, despite the name change to Microsoft Defender. You may see a folder after Windows Defender called Policy Manager. Don’t click on it. Instead, select the Windows Defender folder as shown in the following image.
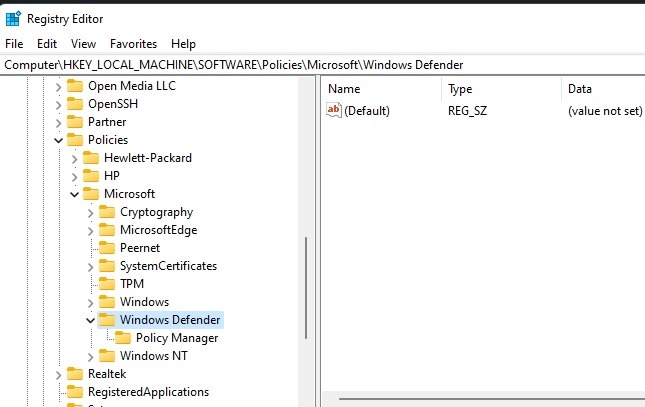
On the right side of the window, you may see a file called DisableAntiSpyware. If you do, that’s great! If not, we’re going to have to make our own. Right-click on the empty space on the right side of the window, and go to New -> DWORD (32-bit) Value.
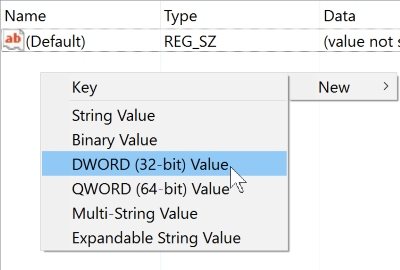
Windows will create an untitled DWORD file. Right-click the file, and click Rename, then call it DisableAntiSpyware. Make sure you enter the name perfectly!
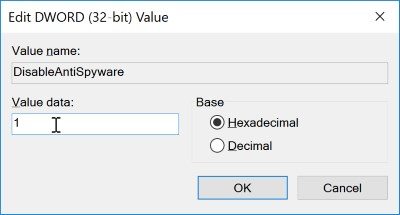
Right-click the DisableAntiSpyware file, and click Modify.
To enable the policy that disables Microsoft Defender, set the value data to 1, and click OK. This tells the computer that the policy that was just created should be enabled, and Windows will disable Defender for you. If you want to bring Microsoft Defender back, return to this file, and change the value to 0 to disable the policy and allow Defender to work again.
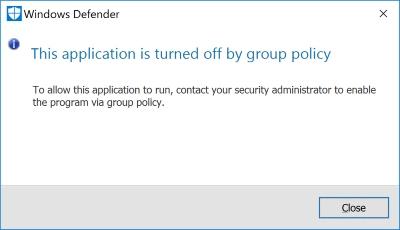
The next time you try to load Microsoft Defender, you’ll see the following error message, saying it’s been turned off.
If anything related to Defender is still running, add the following DWORD values in the following folder locations using the same process as above:
- DisableRealtimeMonitoring – set the value to 1.
- DisableRoutinelyTakingAction – set the value to 1.
- DisableAntiVirus – set the value to 1.
- DisableSpecialRunningModes – set the value to 1.
- ServiceKeepAlive – set value to 0.
You may also need to create three new folders under Windows Defender. Right-click the Windows Defender folder, and select New -> Key. Add three new Keys: Signature Updates, Real-Time Protection, and Spynet.
Add the following DWORD values to the corresponding folders:
HKEY_LOCAL_MACHINE\SOFTWARE\Policies\Microsoft\Windows Defender\Signature Updates- ForceUpdateFromMU – set value to 0.
HKEY_LOCAL_MACHINE\SOFTWARE\Policies\Microsoft\Windows Defender\Real-Time Protection- DisableRealtimeMonitoring – set value to 1.
- DisableOnAccessProtection – set value to 1.
- DisableBehaviorMonitoring – set value to 1.
- DisableScanOnRealtimeEnable – set value to 1.
HKEY_LOCAL_MACHINE\SOFTWARE\Policies\Microsoft\Windows Defender\Spynet- DisableBlockAtFirstSeen – set value to 1.
Using Local Group Policy
If, for any reason, you can’t enable Local Group Policy on your version of Windows, skip this section, and use the other methods listed.
Press Win + R to load the Run box, type gpedit.msc into the box, and press OK.
If you’ve tried enabling Group Policy in the Home edition of Windows, and you still get the following error, it means you cannot use this method to disable Windows Defender or Microsoft Defender. In this case, you’ll want to use one of the other two remaining methods outlined in this article.

When the Local Group Policy window loads, select Computer Configuration -> Administrative Templates on the right.
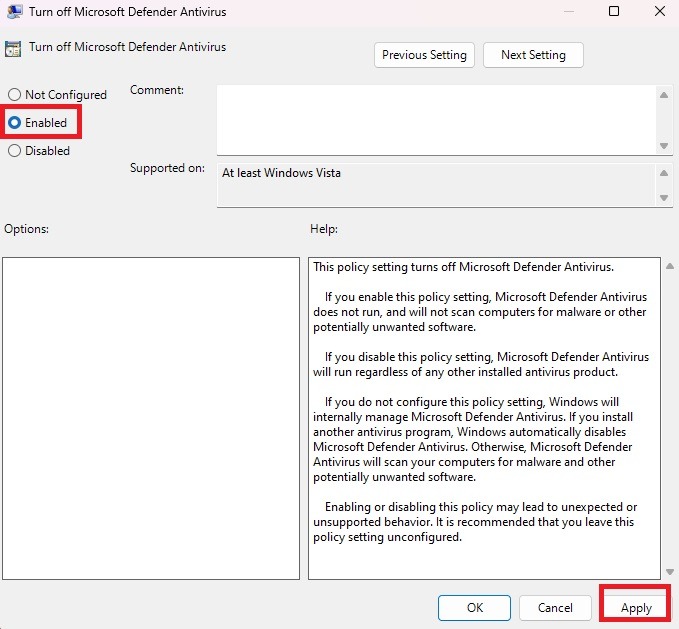
Go to Windows Components -> Microsoft Defender (Antivirus). If you don’t see Microsoft Defender, look for Windows Defender (Antivirus). Scroll down until you see the Turn off Microsoft Defender file. For older versions of Windows 10, look for Turn off Windows Defender.
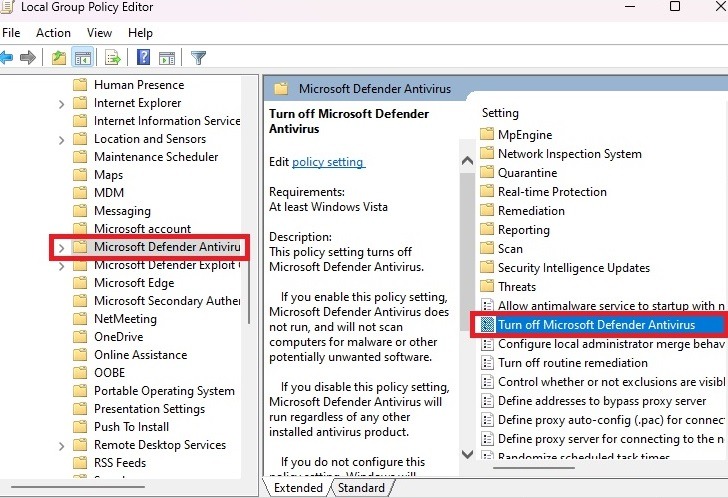
Double-click it, and click Enabled on the left to turn on the Turn off Microsoft Defender policy, which disables Microsoft Defender. If you later change your mind, select Disabled instead.
Use a Third-Party Antivirus
You’re not under any obligation to use what Windows comes with. While it does work surprisingly well, you can use any third-party antivirus. This is also an easy way to permanently disable Microsoft Defender.
Download and install the antivirus of your choice. We have several recommendations, along with advice on using a third-party antivirus with Windows 11.
Once installed, Microsoft Defender should go into passive mode, which means it’s no longer running. If your antivirus doesn’t have a firewall, the Microsoft Defender firewall will still run.
Check that your system is using the correct antivirus by going to Start -> Settings -> Privacy & Security -> Windows Security.
Select either Virus & threat protection or Open Windows Security, depending on your version of Windows. If you choose the latter, you’ll need to select Virus & threat protection on that page.

Select Manage providers. Depending on your version of Windows, this may be listed in the center of the window or to the far right.
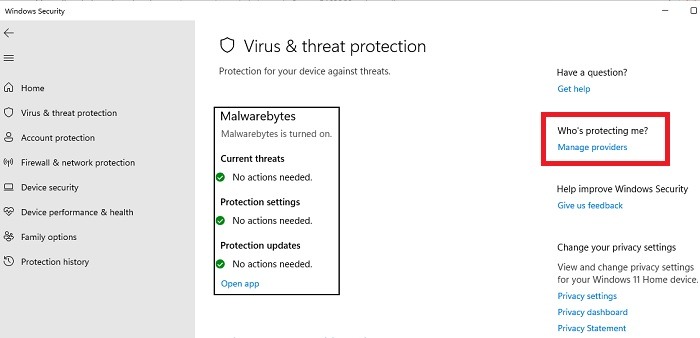
Check that your third-party antivirus is turned on and that Microsoft Defender Antivirus is turned off. If it’s the other way around, select your antivirus, and turn it on, then turn off Defender.
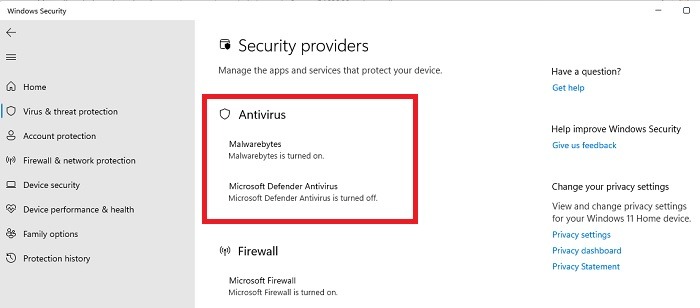
If you have another firewall installed, you’ll also be able to change your firewall preferences under the Firewall & network protection section. Otherwise, the Microsoft Firewall will stay on.
Disable Periodic Scanning
Even if you’ve installed another antivirus, Windows may still run periodic scans. These won’t run at the same time as your third-party antivirus, but if you want to fully disable Windows Defender, you’ll want to stop these extra scans. By default, Windows 11 turns periodic scans off when installing another antivirus, but Windows 10 doesn’t always do this. And sometimes Windows updates turn the setting back on in both versions of Windows.
Go to Start -> Settings -> Privacy & security -> Windows Security. Open Virus & threat protection. If this isn’t an option, select Open Windows Security first. Expand Microsoft Defender Options.
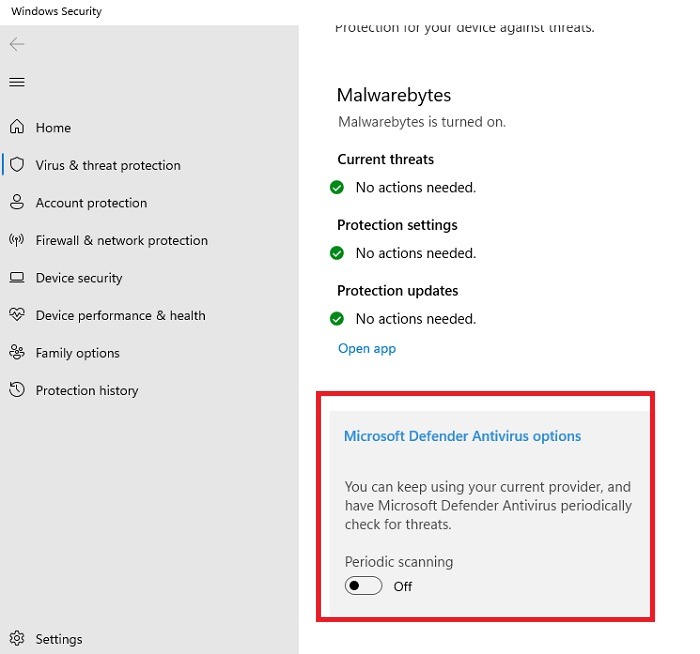
- Turn off Periodic scanning.
Disable Microsoft Defender Tasks
If Microsoft Defender is still trying to run, you may need to manually disable a few tasks and services.
Click the Start menu, and search and select Task Scheduler. In the left pane, open Task Scheduler Library -> Microsoft -> Windows -> Windows Defender.
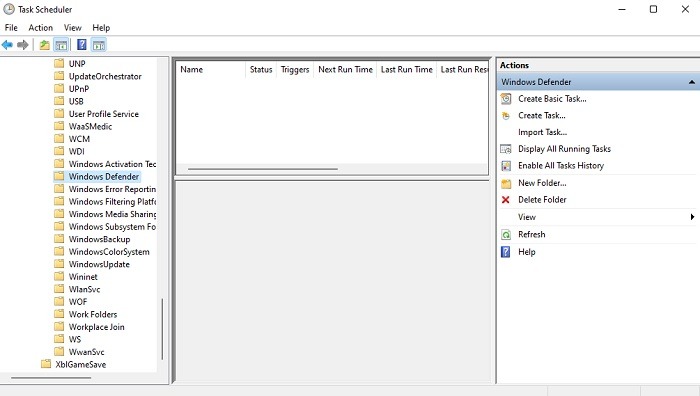
If you see any tasks listed here, right-click each one, and choose Disable.
As a final step, you may also need to disable one or more Windows Defender services. This is especially true if you’re having trouble turning off the built-in firewall and want to use something else. Press Win + R, type services.msc, and click OK.
Look for both Microsoft Defender and Windows Defender. I had the following services listed: Microsoft Defender Antivirus, Microsoft Defender Antivirus Network Inspection Service, and Windows Defender Firewall.
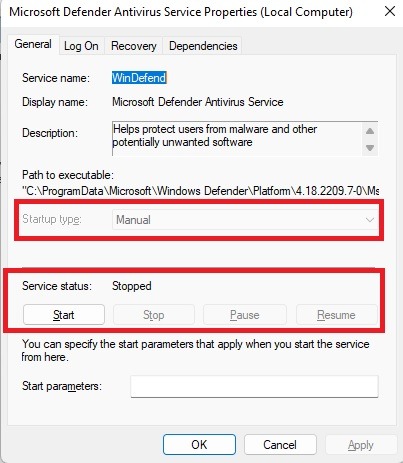
If the services are listed as Manual or Disabled under Startup Type and aren’t listed as Running, you don’t need to worry about it. If it’s running or listed as Automatic, right-click the service, and select Properties.
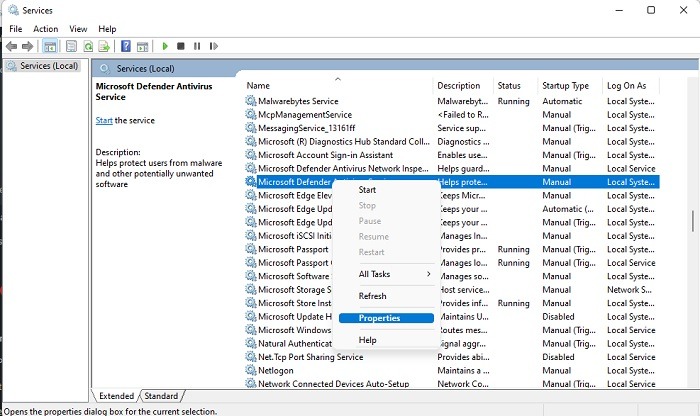
Stop the service if it’s running, and change the Startup type to Manual or Disabled. Manual is good if you want to manually choose when to use Microsoft Defender. Otherwise, disable it. Press Apply to confirm the changes. You may be prompted to restart your computer after disabling tasks and services.
It’s nice that Windows includes built-in antivirus protection, but use what you want. Disable Microsoft Defender, or disable Windows Defender on older Windows 10 PCs, and install a more comprehensive solution. While going without an antivirus isn’t a good idea, you can remove a virus without antivirus software. If you want to put your antivirus to the test, try it safely against real malware.
Image credit: Unsplash. All screenshots by Crystal Crowder.
Our latest tutorials delivered straight to your inbox